 As a child, I was among the millions of children fascinated with a long tube that would bring dazzlingly brilliant colors and designs to my eye with a simple twist of the wrist. As I grew older, I began a small collection of unique kaleidoscopes filled with beads, crystals, and colored paper. These periscopes into the world of ever-changing patterns still intrigue and stimulate my imagination.
I brought this fascination with patterns to my fabric quilting, making art quilts that played with geometric designs. Brent and I talked about reproducing some of our photographs with fabric, using a technique called “color wash” that uses fabric like paint to create an impressionistic form of fabric art. I also decided to bring the skills of quilting to photography and created PhotoQuilts. We currently feature these images on customized note cards and are looking to expand them to other formats.
 With a fabric quilt, you have two elements to work with. One is the pattern of the design and the other is the pattern within the fabric choices. Using fabric to “paint”, the shape of the piece of fabric is not as important as the pattern and colors within the fabric itself. Using only squares, diamonds, or triangles, the flow of the colors paints the design across the quilt, moving from dark to light.
 Other more “artistic” quilters go beyond the geometrics, seeking the patterns in abstracts and details not limited to squares, diamons, or triangles. These people push fabric beyond its texture limits, using combinations of color, shape, size and texture to create incredible works of art. I wanted to find the patterns within our nature photographs to go beyond just the simple geometric designs.
I found that I can use a scanned photograph as a piece of  fabric, flipping, mirroring, and reversing the same image, or a pair of images, into graphic designs I call “photoquilts”. The photographic image becomes the fabric, which I blend into shapes and designs that stimulate the imagination.
How it works
In reality, you can take just about any image and hold it up to a mirror to create its opposite. The true art of creating a kaleidoscope effect is to choose an image with the right characteristics to dramatically enhance the pattern.
 Look for images simple in design but with some strong textures and patterns. Images with strong graphic interplays, such as bold shadows, are excellent choices. Choose images with patterns going right out to edge. Also consider images with patterns crossing from side to side. Abstract patterns work very well, though traditional patterns can be equally good.
  I recommend starting with abstracts to become familiar with the surprising results. Tree bark, snow scenes, trees, rocks, geological and water patterns are all good choices to begin with. From there, it is up to your imagination and some trial and error.
This kaleidoscope technique is not new. Many photographers make copies of their prints and glue them together to create designs. With today’s computer, just about any graphic software program can handle this. Paintshop Pro and Photoshop are probably the best two programs to work with, but you can also use the simple Paint program that comes with most Windows versions.
Using 16 Copies of the Original

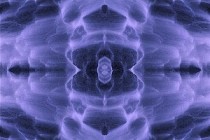
 This original image of a closeup of a prickly cactus. The spikes shoot out with star effects, and the image begged to become part of a PhotoQuilt. I took the image and mirrored it, then flipped the mirrored pair, and then repeated the process for a total of 16 copies of the original, connected together in a PhotoQuilt. The end result resembles a Persian rug or one woven by North American Indians, the strongest of the spike patterns creating a box in the center area. The intricate pattern can be looked at over time, finding new patterns and shapes, and fascinating texture and a feeling of depth, the symptoms of a successful pattern.
Protect your original digital image by starting with a copy. Bring it into your graphics program and place it within a new large “canvas” on your screen, with plenty room to add more pictures and to move them around. Copy and paste another copy of the image onto the canvas, then flip or mirror the copy selection. Bring two of the “matching” edges together, taking care to line them up and close any gaps. What are the results?

Copy duplicate to one side

Reverse one side and match edges

Copy the first pair and add them to one side

Reverse one pair and bring the two pairs together to see the effect

Reverse top and bottom to create another effect

Turn the whole thing on its side to see a new perspective

Now try it again with the two same images. Flip the pictures the other direction, bringing different edges together. Move one to the other side, or to the top or bottom. Experiment to see which combinations you like best. Save your final result and you have your own photoquilt.
Sometimes the effect created with two copies of the same picture is enough to create an interesting kaleidoscope effect. Sometimes you might want to go further. Copy the entire resulting image and paste it below, beside or on top of the first result, mirroring or flipping that section. Move these two sections together, experimenting with placement, for an entirely new end result. Copy these two new sections as one piece and paste in a new section, bring those together and see what new effects you can create. Keep going until your quilt has grown and you are happy with the results.
 Look for strong graphics with a sense of depth to create Photoquilts with a sense of depth and dimension. In the image on the right, the original picture featured larger tuplips in the foreground and the sense of smaller tulips in the background, echoing the ones in the foreground. Put together in the PhotoQuilt, this echoing distance adds to the sense of dimension in the image. In the
  PhotoQuilt to the left, ice bergs photographed on Lake Portage in Alaska with the mountains and clouds in the distance offer an obvious sense of distance, but when put together in a PhotoQuilt, this distance, clouds and ice creates an interdimension image, an almost intersellar effect.
To create a more quilted effect, playing with light and dark, flip every other section so that the pattern is up, down, up, down, and see if you like the effect. With some designs, the results are exciting. With others, they become confused and muddy with a lack of clear pattern. Play around and see what effect you can create with your images.
 Your designs aren’t limited to just patterns or textures. You can also use wildlife images, if
  the shape compliments the quilting process. In the image to the left, the pink flamingo’s head and neck form a strong graphic element easily recognized as the letter “S” which compliments the pattern process.
Expanding Your Creativity
As a long-time believer in traditional methods, I was uncomfortable with my photographic creations at first. I showed them to only a few people, nervous about their reactions and judgements. I was surprised at the honestly enthusiastic response. These are completely different from the original images. They stretch the imagination, playing with the mind as it analyzes them and tries to figure out how they are done. They are Rorschach tests in a way. Some of the results are peaceful, thought-provoking and exciting. They celebrate the natural world in a different way than our traditional images do. More importantly, this technique stretches my mind and creativity. I’m starting to look around and see greater possibilities in all my photography. Why not stretch your creative spirit a little?