What does a properly exposed photograph look like? By properly exposed, we mean that the photo you get back looks the way you imagined that it would. If you want a blue sky, the sky comes out the right shade of blue. If your goal was a silhouette but your photo shows all the details of your subject, you overexposed the film, even if another person thinks that the picture is perfect. So how do you decide what you want and how do you get your vision onto the film?
Camera meters are relatively simple devices. They don’t think, they simply react to the situation in a predictable way. Our job is to learn what the meter will do and compensate to get the results we want. Some cameras have more metering zones than others, but each zone works in the same basic way.
The Light Meter
Light meters are found inside your camera. Older meters are usually “center-weighted”, meaning they read the amount of light within the center of the frame. Newer cameras usually offer more complex meters, allowing them to read the amount of light from many places within the frame. There is usually a box or circle in the viewfinder that designates the metering area. As the light changes within your metering area, your camera will give you some kind of indication of that change.
Meters are very simple tools. They cannot see color. Meters only read tonality, the darkness or lightness of an image. The meter looks at the light in the viewfinder and recommends an exposure by comparing the light pattern and quality with some kind of reference. Meters read the amount of light in and average it. The meter looks at the brightest spots and the darkest spots and says, “Let’s be safe and put it in the middle.
This is fine, if you are after “average” toned images. But if you are photographing dark black rocks, instead of getting black rocks, you would get gray rocks, as the meter would average the light to capture gray rocks. If you were after white snow, your film would come back as gray. The meter can’t think “Oh, this is snow. I need to make it white.” It can only “average”.
Understanding how the meter works is very important when photographing extreme or unusual lighting conditions. Let’s explore it just a bit further.
There are four variables which can affect your camera’s meter: the aperture on the lens, the shutter speed, the quantity of light available at the time you take your picture, and the brightness or tonality of your subject. Your camera already knows the aperture and shutter speed because you either set these manually, or you let the camera choose them. That leaves the quantity of light and the tonality of your subject – and your camera meter has no way to tell the difference between the two.
If the sun goes behind a cloud, the quantity of light decreases, and your meter will register that change. In the same way, point your camera at a light colored rock, then point it at a dark rock, and the meter will tell you that the exposure has changed, even though the light has not.
Camera designers had to make a choice. What they chose was to calibrate the meter to accurately expose “middle-toned” subjects, those subjects neither light nor dark, but somewhere in between. The reference point they chose was 18 percent, roughly three stops brighter than black and three stops darker than white. A subject that reflects 18 percent of the light that strikes it is called a middle-toned subject.
Probably the hardest technical problem photographers have to overcome is learning how to use their meter to make a properly exposed photograph. Since your camera’s meter is calibrated to properly expose middle-toned subjects, it stands to reason that any subject that is not middle-toned will not be properly exposed. Here is the catch: Your meter does not tell you how to make a properly exposed photograph. It tells you how to make the thing you are metering come out middle-toned. If your subject is middle-toned in real life, then your exposure will be perfect. But unless we override our camera’s meter, dark subjects and light subjects will also come out middle-toned. And that’s not right.
Going Against the Meter
So how do we fix the problem? If we meter a light subject, like a snow-covered field, we know what the meter is going to do. It’s going to make the snow look middle-toned, or gray. We don’t want gray snow, so we have to manually compensate by adding back in the light that the meter has told the camera to remove. We add extra light to the exposure of light-colored subjects to make them appear normal in the photograph. And we do this by either opening the aperture or by slowing the shutter speed from the value that our meter tells us.
In the same way, suppose we are photographing a dark subject like wet tree bark or a dark rock. Our meter is going to try to make the bark look middle-toned. It tries to make everything we point it at look middle-toned. So we have to manually compensate by taking away the extra light that the meter has told the camera to add. We remove light (or add darkness) from the exposure of dark-colored subjects to make them appear normal in the photograph. And we do this by either closing down the aperture or by increasing the shutter speed from the value that our meter tells us.
Let’s go over that again. Meter your subject. Compensate from what your meter tells you by adding more light for light-colored subjects or by subtracting light for dark-colored subjects. Take the picture. A handy phrase to help us remember this is: Add light to light, add dark to dark.
Add light to light, dark to dark
How much light should we add or take away? Slide film has a latitude or a range of tones that it can record of about 5 to 6 stops from overblown white to blocked up black. The range of tones might look like this:
| Meter adjustment |
Subject Tone |
Tonal Shift |
| +2 stops |
Very light subject |
|
| +1 stop |
Light subject |
|
| 0 stops |
Middle-toned subject |
|
| -1 stop |
Dark subject |
|
| -2 stops |
Very Dark subject |
|
To be honest, the number of natural subjects that require the addition of two stops is rare; white sand and snow on a cloudy day are the only ones that comes to mind, and I can’t think of any that require a minus two stop correction. I would expose even a black bear at minus one stop from my meter reading because I want to make sure I can see the detail in its fur.
When working with extreme light conditions, or specialized light, your camera can be fooled into seeing something different from the image you wish to capture. As stated, the meter reads the brightest spots of light and the darkest spots of light and decides what is the in-between exposure. It averages everything it sees. To get a really dark silhouette, we need to underexpose the image since the meter will try to produce a medium tone.
Use the phrase “Add light to light, add dark to dark”. When you want something to be as dark as the eye sees it, you fool your camera meter and add “dark” to the image. You can add dark by increasing the shutter speed or by closing down the aperture.
Add Light to Light
White colors influence the meter reading, fooling it into thinking that there is too much light. The white snow and ice on this bright white glacier is just too much light, so the meter shuts down to even out the light, turning the glacier gray. By adding light, we add back what is taken away by the meter to correct the light to make the glacier white, the color it should be.

The meter read this bright white glacier as too bright and “grayed” it to average.

By adding “light to light” by slowing the shutter speed to let more light in, the “white” was achieved.
Another example is the trick bright white objects like snow and fog can play with the meter. Unless we compensate, snow will be exposed as dark and almost dirty because the meter shifts the exposure to middle-toned. Using the “add light to light” theory, by overexposing or adding light to the image, the snow becomes whiter. The eye saw white snow. Not dirty snow. Using the “add light to light” idea, it becomes easy to adjust for light- or dark-toned subjects.
Exercises
- Metering for Average
- Find a subject that you think is middle toned. Make a series of five exposures from two stops underexposed to two stops overexposed.
- Light to Light
- Find a light subject and photograph it at the meter reading, and at one and two stops over.
- Dark to Dark
- Find a dark subject and photograph it at the meter reading, and at one and two stops under.
Metering by Proxy
We said the camera’s meter is calibrated to make a correct exposure of a middle-toned subject. If our subject is middle-toned, we can simply meter it and take the picture. If our subject is not middle-toned, we adjust our exposure to compensate using the “light to light, dark to dark” theory. But this means we have to make a mental estimate of how far the subject is from middle-toned. Is it a half stop or a full stop brighter than neutral?
There’s another option. If we could find a middle-toned object in the same light as our subject, we could simply meter this object, recompose, and photograph our subject without directly metering it. This is possible because when we meter, we’re measuring the amount of light. If two objects are in the same light, and if the exposure is correct for one of them, it should be correct for the other one, also. The key is that the two objects must be in the same light. If you meter an object in the shade while the other is in full sun, your exposure will be incorrect.
Some photographers carry a middle-toned subject with them wherever they go for this purpose. This is called a “gray card”, and it reflects exactly 18% of the light that strikes it. Meter the gray card, set the exposure, and any other object in the same light as the gray card will be properly exposed.
 What if you don’t have a gray card? The one object that every photographer has is the palm of his or her hand, but your hand isn’t middle-toned. Whether your skin is light or dark, white, black, pink, or some other color, the palm of your hand is about one stop brighter than middle-toned.
To use your hand to make a correct exposure, compose and focus on your subject. Then, if you have autofocus, turn it off. Without focusing, fill the frame with the palm of your hand, taking care to ensure it is in the same light as your subject. Make a meter reading and open up one stop by opening the aperture or slowing the shutter speed by one stop from what the meter told you. Point the camera at your subject to recompose if necessary, and take the picture. It’s simple, and it works for everyone on the planet.
Aperture and Shutter: How do they relate?
A camera in its simplest form is just a light-tight box that holds the film in place with an opening in front to let the light in. A lens is placed in front of the opening to focus the light on the film. A device called the shutter opens and closes to control the amount of time the light is allowed to strike the film. The aperture inside the lens changes size and controls how much light is allowed to pass through.
Aperture of the Lens
Examples of aperture openings on lenses.

Lens open wide at f 1.4

Lens open medium at f 8

Lens open smallest at f 22
The shutter is like a curtain. When it opens, light passes through. It can be opened and closed very slowly to allow a lot of light to pass, or very quickly to allow a small amount through. Its speed is variable and is controlled by the photographer. Most cameras have a range of shutter speeds from 1 second to 1/1000 of a second. The fastest camera on the market has a top shutter speed of 1/12000 of a second (Minolta 9xi). At the other extreme, times of many seconds or hours are possible for low light or night photography.
The standard series of shutter speeds is 1 sec, ½ sec, 1/4 sec, 1/8 sec, 1/15 sec, 1/30 sec, 1/60 sec, 1/125 sec, 1/250 sec, 1/500 sec, 1/1000 sec. Each shutter speed is twice as fast as the one before it. That means that each successive shutter speed allows only half as much light to pass through before the shutter closes.
The aperture is like the pupil in the eye. It opens wider to allow more light to pass and closes to restrict the amount of light through. It also controls the depth of field. On most older cameras, the aperture was adjusted by turning a ring on the outside of the lens. Many newer cameras have dials or adjustments on the camera body itself.
The size of the aperture is denoted by the f -stop selected. The standard series of numbers is 1.4, 2, 2.8, 4, 5.6, 8, 11, 16, 22, 32. This series seems odd at first, but there is a mathematical relationship between each f -stop and the next–each number is 1.4 times larger than the one before it. The diameter of each opening is 1.4 times smaller than the one before it, and that means that it lets in half as much light. To repeat, each aperture lets in twice as much or half as much light as the one next to it. And the bigger the f -stop number, the smaller the opening.
The Water In The Bucket Theory
Understand Exposure
Examples of the under and over exposure elements of photographic exposure.

Overexposed – too much light

Proper exposure – just enough light

Underexposed – not enough light
The aperture and the shutter speed work together to control the amount of light. A good way to think about them is with the analogy of a bucket of water and a faucet. If you want to fill the bucket with water, you can do it with a lot of water for a short amount of time, or with just a trickle for a long time. The amount of water it takes to fill the bucket is the correct exposure, the correct amount of light for a properly exposed picture. The handle on the faucet is the aperture which controls how fast the water fills the bucket. And the time the faucet is on represents the amount of time that the shutter will let the light in. Obviously, if you want to fill the bucket faster, you have to get more water through the faucet and that is limited by the physical size of the faucet. Another option to filling the bucket faster is to get a smaller bucket, that is, to use a faster film which requires less light.
In a real situation, you are faced with certain lighting conditions over which you have little control. You have to choose a lens, aperture, shutter speed, and film that matches the conditions. Assuming you only have one lens and one type of film with you, let’s look at the aperture and shutter speed.
The first thing we usually do is decide which aperture to use. We’ll talk about depth of field and aperture later, but let’s say that f 8 is the best choice. Take a meter reading and the camera will say what shutter speed it should use. Let’s assume that the meter says 1/125th of a second will give a proper exposure. Does this mean that the combination of f 8 aperture and 1/125 shutter speed is the only choice? No.
Remember that each aperture and each shutter speed are related to the next one by twice as much or half as much light. So f 11 is half as much light as f 8 (the bigger the f -stop number, the smaller the opening). If we set the lens to an aperture of f 11, we have reduced the size of the lens opening so that only half as much light gets through. To compensate, we have to add more light for a proper exposure, so we do that by slowing the shutter speed one setting from 1/125 to 1/60. We also could have set the aperture to f 4 and the shutter speed to 1/500, for example; there are many correct combinations.
22 Metering and the Creative Decision
Since there are so many combinations which give a “correct” exposure, how do you decide which one is best for you? This is a creative decision, and one which can give your pictures an entirely different feel.
Shutter Speed Examples
Examples of shutter speeds controlling the speed of a moving subject. A friend rides by on a bicycle and you can see the difference in the speed of movement based upon the shutter speed.

250 th second at f 4

60 th second at f 8

15 th second at f 16

1/4 second at f 32
The shutter speed you choose for a moving subject has a direct impact on the feeling of speed that shows in your picture. A fast shutter speed will stop the motion, freezing action. A slow shutter speed will allow any movement to blur, while those parts of your picture which are not moving will be sharp. A general rule of thumb is that moving subjects require fast shutter speeds and the faster they move, the faster the shutter speed required. An animal which is perfectly still may be photographed as slow as 1/15 to 1/30 with a reasonable chance of getting a sharp picture, if your technique is perfect and you take several shots for insurance. But a moving animal will usually require 1/250 or faster.
The aperture you choose is an equally important part of the decision, because it directly affects the depth of field. Depth of field is the range of apparent sharpness from front to back in your photograph. Objects within the depth of field appear sharp, and those outside of it are out of focus. The larger the f -stop, the smaller the aperture, and the larger the depth of field. To repeat, the larger the f -stop number, the larger the depth of field. The smaller the f -stop, the smaller the depth of field. What this means is that if you want as much as possible to be in focus, stop down as far as your lens will allow, usually f 22 or more.
In most cases, a large depth of field is wanted for scenic photographs. We want to see the detail in the flowers in the foreground and the mountains in back. f 22 is a good choice. At other times, an out of focus background eliminates distracting elements so that our attention is on the subject, as in a closeup of a single wildflower. I might shoot this at f 4 or maybe f/5.6. In some cases, it just doesn’t matter which aperture to use, so I pick one in the middle like f 8 or f 11. Look in the Popular Photography lens tests and you will see that almost all lenses are at their best around f 8 and f 11, exhibiting greater sharpness and less distortion.
Examples of Artistic Control of Exposure
The amount of light allowed into the camera, exposing the film, controls much of the artistic quality of the results. A shallow depth of field caused by a wide aperture blurs the foreground and background of a subject. A moving object is controlled by the amount of light coming through in a combination of shutter and aperture controls which slows the shutter speed down to trace the movement of the subject across the screen, such as with the waterfall below.

To add a sense of distance to this landscape of an old barn, we chose a small depth of field (large aperture) to blur the flowers in the foreground.

A slow shutter speed creates a blurred motion effect of this waterfall.
Like all things in life, there are tradeoffs between aperture and shutter speed. We have to have a certain quantity of light to make a proper exposure; remember the bucket of water? If we close the lens down to get more depth of field, we may not have enough light to stop the motion of our subject. Open the lens for a fast shutter speed to stop the motion, and the depth of field may suffer. Or we make knowing decisions by understanding how our equipment works, and therefore we know a larger aperture will give us a shallow depth of field and a slow shutter speed will blur our subject. These creative possibilities allow us to play with exposure to create the effect we want. So we have to strike a balance and get as close as we can to the vision we have in our mind.
Exposure Exercises
The following exercises are the kind of problems you are likely to run into in the field. Working these will help you deal with any exposure situation. The answers will be found below the Exercises.
1)How many stops are between f2.8 and f4? f4 and f5.6? f5.6 and f11? f2.8 and f16? From halfway between f4 and f5.6 to halfway between f8 and f11?
2)How many stops are between 1 second and 1/2 second? 1/2 and 1/4? 1/125 and 1/500? 1 second and 1/1000?
3)Suppose your meter tells you that proper exposure is f5.6 at 1/125. What is an equivalent exposure at f4? f16? What aperture would give you 1/30 of a second? 1/8 of a second?
4) If your meter tells you that f5.6 at 1/125 is correct and you instead shoot at f4 at 1/125, have you added more or less light? How many stops? Is f11 at 1/60 more or less light? How many stops?
5) Your meter tells you that f5.6 at 1/125 is correct. If you keep your shutter speed at 1/125, what aperture would add 2 stops of light? If you shoot at f5.6, what shutter speed would make your photo 2 stops darker?
Add Dark to Dark, Add Light to Light
Consider the following pictures and estimate how much “dark” or “light” you would add to the average meter reading shown to create the “right” exposure.
Exercises
- Depth of Field
- Select a fence or a row of trees. Focus on the fence about midway in front of you. Take three shots, at your largest aperture, f8, and the smallest. Adjust your shutter speed for a correct exposure in each case. Notice how the depth of field changes.
- Shutter Speeds
- Find a moving subject like a car on the road, jogger or walker. Shoot at the fastest shutter speed possible (this will be at your largest aperture). Make another exposure at f8, and a third at the longest shutter speed possible (at your smallest aperture).
Answers
1) f2.8 to f4 is 1 stop. f4 to f5.6 is 1 stop. f5.6 to f11 is 2 stops. f2.8 to f16 is 5 stops. f4/5.6 to f8/11 is 2 stops.
2) 1 sec to 1/2 sec is 1 stop. 1/2 sec to 1/4 sec is 1 stop. 1/125 to 1/500 is 2 stops. 1 sec to 1/1000 is 10 stops.
3) f4 at 1/250. f16 at 1/15. f11 at 1/30. f22 at 1/8.
4) Added one stop. One stop less.
5) f2.8. 1/500.
Add Dark to Dark
1) Grass is neutral – no change
2) Elephant seal is neutral – no change
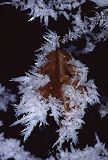
3) Burnt log is black – add dark or meter for red-gold leaf and add light
4) Daffodils are yellow (light) – add light

 You are standing out in the freezing cold, looking for that award-winning snow scenic, but what do you do with all that white? We can understand protecting ourselves from the cold, but how about protecting our exposure from the elements?
 accord. Each film “pushes” a particular color that can affect the color white. Fuji’s Velvia film can often make snow pink or almost violet in coloration. Agfa and Scotch films give a greenish blue hint to snow. Kodak’s Ektachrome paints blue tinted snow. Film is changing and evolving all the time so if you are serious about your winter whites, study how each film responds to the “color” white to get the best results.
 Imagine a scene of pristine snow over the ground and a lovely tree all covered with the white stuff. Using the averaging method typical of your camera’s meter, it will average the bright white snow down to gray snow. The whiteness is too bright so the camera compensates by recommending a “darker” exposure. Mary Ellen Schultz, a renowned nature photographer who specialized in close-up photography, had a wonderful phrase for figuring proper exposure: Add light to light, add dark to dark. By adding light, or overexposing a bit, you make what is light lighter. Try it. Take a picture at your meter’s reading of a snowy scene and then another with a third or half stop over-exposed and even another with one stop over-exposed. See which one you like better (best done with slide film).
 If you are photographing only the tree in the picture, the dark wet bark against the bright white snow will turn black if you meter off the snow. Meter off the bark and follow the chart by adding dark to dark to keep the tree back dark.
 Try this technique on other things besides snow. How do you expose for a light yellow flower or a dark red rose? At your meter reading or do you need to adjust it?Slide film has a very limited range of tones, from black to white, about five stops from washed out white to solid black. The chart shows the difference in the range from light to dark and how this works.
 Snow. Ice. Zero temperatures. Wind chill. Runny noses. Frozen toes. Hats. Goggles. Gloves. Boots….just the thought of going outside in the frigid weather can halt all initiative. Face it, it’s freezin’ butt cold and the last thing you want to do is go outside and stand still for hours taking pictures of cold stuff. Yet winter offers a wonderful variety of opportunities for photographers.
 Keeping yourself warm is often thought of as an easy thing to do: just trot down to the local outdoor outfitter and buy the latest in cold weather gear. It’s not quite that easy, though it can be expensive. What you choose to wear should depend on what you will be doing. Ask yourself the following questions:
 Polypropylene and the newer fabrics for long underwear are great for pulling the moisture away from the skin and still keeping the heat in. If you will be panting, there are few things more painful than sucking ice cold air into hot lungs. A face mask or scarf wrapped across the nose and mouth will protect the lungs from the frozen sting.
 Another problem in the cold weather battle is keeping your camera functioning and protected from the cold. As modern cameras become more dependent upon batteries, the battle against freezing temperatures intensifies. Nothing can stop a battery faster than the cold.
 Condensation is a serious cold weather problem. As you move from the cold to the warmth of inside, condensation forms on eyeglasses, coats, and camera equipment. If you go right back outside, the water droplets can freeze and be potentially damaging. To protect the camera and lens, wrap it in a plastic bag and squeeze as much air out as possible before moving between temperature changes. The condensation will form on the outside of the bag and not inside. Wait until the camera reaches the inside temperature before removing from the bag.
 film from extreme cold. Ice fishermen use ice chests in winter to keep beer from freezing, and it works for photographers – without the beer.
 A waterproof camera bag is a great help, but not if it hangs open waiting for the wet to fall inside. Keep the lid closed, even if it’s not sealed, to keep it dry. The waterproof is on the outside not inside. Even if the outside is waterproof, avoid leaving the camera bag sitting in the snow.
 Camera and film purchases soar during the summer months. People take more pictures during the summer, especially on vacation, than at any other time except Christmas. Examine their photos and see people standing in front of national monuments and tourist locales squinting back at the camera.
 The differences in colors, tone, quality, and emotion of a photograph are controlled by light. These two images were taken moments apart as the sun was setting. What are the differences in emotional quality and intensity? Which do you prefer? Waiting for the light makes all the difference between a good picture and a great picture.
 Getting up early isn’t easy for most people. What makes this more challenging for nature photographers is that we want to BE at the location when dawn comes. Often, this means getting up at 3 or 4 in the morning.
 The midday sun shining directly down upon the forest creates harsh shadows, often disguising the wildlife resting in the forest. When a cloud comes by, the animals are suddenly revealed. Sometimes you can wait for a passing cloud to come by and improve the quality of your wildlife images on a bright and sunny day.
 This is the best time of the day for photographers, and the busiest. The setting sun creates a wide range of tones and colors from soft to intense, creating ever changing magical light on your subjects. It is also the end of the day shift for animals and beginning of the night shift for the rest. While the crowds are at dinner or staring off into the sunset holding hands, get out your camera and start to work on the warm colors bouncing off everything.
 Summer brings many challenges for the photographer, the worst being the battle for space in the popular tourist spots. It’s not just the battle for a place to set up a tripod, it is a fight to get THE SHOT without eight million people in the foreground, in your way, bumping you, or asking you insightful questions like “Are you a professional photographer?” while the moment and light are passing you by.
 Nature photographers know the best time for photography is very early in the morning and late in the evening, both times when most sensible people are either still in bed or having dinner. Photographing at these times keeps you clear of the masses, unless it is sunset time from somewhere spectacular for sunset watching. In that case, look around for another place to capture the same sunset, or use the light to photograph what people are ignoring. Late afternoon and sunset light casts wonderful warm colors on mammals and birds, as well as trees, rocks and flowers. While everyone is staring at the setting sun, turn around and work away from them.
 With the camera pointed anywhere in the vicinity of the sun, the chance for sun flare increases. Sun flare are created as the sun travels through the barrel of the lens and bounces around between the layers of glass. Where it “bounces” the most, it leaves a bright spot on the film. Zoom lenses are notorious for sun flares. Some flares can be interesting shapes and colors depending upon the shape of the aperture of the lens and the colors of the protective coating on the front element. Usually they are a distraction and nuisance.
 Sun wears down almost everything manmade when exposed over long periods of time. Substances most intolerant to excessive sun exposure include rubber and cloth. Rubber lens hoods and rubber viewfinder eye pieces may dry out and crumble over time. Cloth will bleach and disintegrate. Camera bags and packs will discolor. Newer fabrics such as 1000 denier Cordura Plus hold up extremely well under such tortures, but they will fade out under long-term exposure.
 Our own human bodies need to be protected from the sun as well, but the chemicals in sun lotion and bug sprays can damage cameras and lenses. Even if your hands are clean, sun lotion on your face smears along the back of the camera as you look through the viewfinder. While changing rolls of film, you may touch greasy fingers to the film plate or anywhere inside the camera causing damage to the camera’s innards and the film. The chemicals will eat away at the protective coating on your lens front element and dissolve polycarbonate camera bodies. You may end up with your fingerprints permanently impressed on the camera grip, as happened to me.
 Most cameras have centered focusing brackets or “targets” in the viewfinder. When the focusing area is in the center of the frame, we tend to aim the “sights” at our target, a.k.a. subject. This is called the Bull’s Eye Syndrome.
 Getting the subject out of the center of the frame makes for a more interesting picture. Okay, why? Greek artists discovered that the human eye tends to rest on certain points in an image, and they considered this natural movement “the concert of the eye.” Imagine a grid in the viewfinder, such as a tic-tac-toe pattern: two lines evenly
  spaced across and two lines evenly spaced down. Where the lines intersect is where the eye tends to focus. As the grid breaks up the frame into sections of three, this is called The Rule of Thirds. By placing your subject on one of these intersecting points, the eye can look at the center of interest, then feel free to move around the image to look at the rest of the photograph. A sense of movement is created.
 Humans prefer things in their proper places and looking like they should. We have expectations that water runs down, trees grow up and the earth may be a ball but it looks flat from where we stand. Be careful in threatening those expectations.
 The camera has two formats to choose from: horizontal or vertical. The most popular is horizontal. Is it popular because it looks best? No. It’s popular because that is how cameras are made to be held, flat
  across our faces. Manufacturers make the tripod screw mount to accommodate that format by putting it on the bottom of the camera body. Is it the best composition? Not always. Tall trees are best photographed vertically. There is a feeling of height and power. Landscapes may look best as a horizontal, but not always. Try both ways to see which you like when you get your film back, then decide. It’s an artistic choice, so use it.
 Too often the cougar comes out of the bushes when we aren’t ready to take a picture. Still we grab the camera for a few shots. Then we tell ourselves that even if they don’t turn out, at least we will have recorded what we saw. We get them back to find that we actually saw a blur. It happens. No matter how exciting it is to have a bull moose stride past you, a seasoned photographer learns to prevent getting too excited by understanding how their equipment works, how it sees, and by honing their skills through practice, learning to trust their instincts.
 yourself if what you are seeing is important to the final image. If not, get rid of it. If you can’t get rid of it, reposition yourself or make it work for you. Ask yourself the following questions:
 Using the Rule of Thirds as a starting point, we mentally divide our viewfinder into thirds, both horizontally and vertically, like a tic-tac-toe pattern. By placing our subject at one of these power points, we increase the tension, and therefore the interest, in our pictures. The eye moves around the picture, resting upon the main subject, and then continues on, returning back to rest. With our subject in an interesting placement, we can then search the viewfinder to see what else catches our eye, and decide what else should or should not be included.
 Watch how the eyes move around and through the subject matter in your viewfinder. You are already starting to see what the viewer will see in the end result. Look for lines and flows of subjects that lead your eye into the picture. Is the subject matter strong enough to keep the eye inside the picture frame, or do the leading lines take your eye right out of the picture? Watch how your own eye moves through the image and take another look for distracting elements.
 If there is something special, some action, motion, or drama in the image, make sure you capture the peak action. If the bird is landing on the water, capture the dramatic action of the water splashing out as it touches down. If photographing a waterfall, choose a slower shutter speed to catch the silky blur of the water’s movement. A marmot pops up out of his den and screams a danger warning that a predator is near. The creative drama in your images is enhanced when some form of motion is captured.
 While most of our images are of nature, people can be an enhancement to nature photographs. They provide a sense of scale and perspective. They draw USA, the audience, into the photograph. We tend to see the image from their point of view and not necessarily from our perspective outside the photograph.
 Putting people in your picture can be done in two ways. Either make them the subject of your photograph or make them a detail. To make them the subject, follow the basic compositional rules of putting them in the rule of thirds, or filling the frame with them.
 Make sure you can see their eyes. They say the eyes are the windows to the soul – make sure it looks like someone is home. Watch shadows under the eyes or on the face – they can become a distraction and can make people look tired. Who is that, Alice? A distracting person in your image can pull the eye totally away from the subject of the photograph. Make sure the image is enhanced by the presence of the person.


 By making them a detail you add dimension and scale to your image. A small person in a large canyon provides the audience with a sense of the height of the walls. A dot person in a wide reaching landscape makes us feel small in this vast world around us. If the person is a detail in the image, choose to make them an obvious detail. By having the person wear a red coat or something bright, or be positioned in a way that
  our eye notices them, the viewer looks at the person and then moves to examine the rest of the image. If their eye stumbles upon the person as their eye wanders through the image, the rest of the time may be spent wondering what that person is doing out there, ignoring the rest of the image. Keep a balance and let the person be a part of the image and the audience can share in their discovery.
 Depending upon the source of the light and which side of your subject is illuminated, the direction of the light influences the texture and appearance of your subject. The direction of light is the path the light takes to reach the object.
 Side lighting casts long and often dramatic shadows, so sometimes the shadow play becomes the subject itself. Look for opportunities to work with the shadows of subjects for interesting new perspectives of the familiar.
 Quarter light, similar to side light, is also called three- quarters light. Occurring during the same time of day as side light, the sun is at a 45 degree angle to the back or front of the subject, illuminating half way between side and front or back. Quarter light is considered a flattering light as it gives definition to the shape, making round objects appear round, while allowing the shadows to become a part of the subject itself. It shows detail and definition, providing a subtle definition of depth. It is an excellent light for photographing people, animals, closeup subjects, landscapes, and many subjects which require shadow for definition but not strong shadow lines.
 Back light is lighting with the source behind the subject, the opposite of front light. The back of the subject is illuminated. The light is usually pointing towards the lens of the camera. Back light creates a halo effect or rim light, giving an aura to your subject. Translucent subjects, or subjects with translucent edges, do well with backlighting. Grasses, flowers, insects, plants, some animals, and even people make for interesting backlit subjects. It makes translucent subjects glow as the light passes through the subject. By
  creating a strong silhouette, the light outlines the subject with a glowing illumination. When you create a silhouette with your subject, make sure that the silhouette stands out from the background and that it is easily recognizable.

 Cool colors tend to put off “warm” feelings, but they are also dramatic when used to enhance appropriate subjects. Cold subjects, such as icebergs, a glacier, or ice and snow, do well when rendered with cool light. Our expectation is that these scenes will be cool in color. We also know that twilight and night is cooler, so these images are welcome in the cool, blue tones. Many people tend to feel “blue” and moody in the evenings, so look for photographic opportunities to express sadder, more melancholy subjects with light found during twilight times.
 Shade tends to be blue in tone and is most easily found on bright sunny days. Shadows are blue, as they are illuminated by the blue sky instead of the sun. Blue-toned shade enhances cool, blue-colored subjects such as snow, ice, blue flowers, and water. If you want a subject to appear “cold”, photograph it in the shade. Blue is a color of sadness and sorrow, and subjects photographed in the shade can evoke these emotions, unless the subject is blue in color. Then the color is enhanced and we often feel excitement and stimulation from the vibrant colors.
 Magic light is usually caused by weather conditions, such as storms, which influence the amount and direction of light as well as the color of it. Gentle white puffy clouds can become dark and dramatic with the change of light caused by the weather. Storms bring gray and ominous tones. Crepuscular rays bring hope and brilliance. Rainbows offer hope and wishes come true. Fog creates a sense of isolation and loneliness. The Aurora Borealis, or Northern lights, is created by the charged particles from the sun interacting with the atmosphere to present swirls of green, blue, and sometimes red. Rarely seen, they are mystical and almost spiritual.
 Magic light often happens suddenly, causing the photographer to race around in a desperate attempt to capture the magical moment. At the first sign of a storm or shift in weather conditions, anticipate the potential of the light to cause rainbows, fog, or crepuscular rays. What subjects are around you that will do well under these various lighting conditions? If you think a rainbow might appear, what kind of scenic or subject matter could use a rainbow in the background? If crepuscular rays of light may break through at any moment, what will it illuminate and what lens do you need to capture the “god-light” coming down from the heavens? By anticipating the potential scenes, you can prepare yourself by pre-selecting the lens you need and being ready to capture the scene when it happens. Practice searching for equipment in your camera bag while keeping your eyes on the quickly changing light in front of you so you can be ready when the moment comes.
 Diffused light is beneficial for all kinds of nature photography. It allows the natural colors of the subject to glow, removing the bright highlights direct sun can cause. Forests glow with their own natural colors and vibrancy without the sun washing the colors away or creating “hot spots” in the image. Closeup and macro photographers love diffused light for these very reasons, emphasizing the subject without the distraction of bright or reflected light hot spots. Diffused light eliminates these problems.
 Diffused light also comes in different intensities from the softest effects from high overcast clouds to the dark, misty effects of fog. Fog creates mystery in your scene, whether seen from above as part of a landscape, or from within as the fog swirls around your subject and blurs the background into a white-gray nothingness. Mist and rain also create a soft focus effect, giving a scene a romantic feel, creating dramatic and sensual images.
 When you are photographing for silhouettes and capturing the sun itself in your image, the sun will usually be aimed right at the lens of your camera, often resulting in sun flare problems. Visible through the viewfinder and, depending upon your aperture, the circles or octagonal shapes will appear more or less intense. They are caused by the sun bouncing around in the barrel of the camera lens and reflecting off the glass surfaces inside. To block sun flare, you need to cast a shadow over the front element of your lens. This can be done with a simple lens hood, or you can use a hat, your hand, an opaque reflector, or anything that will cast a shadow over the front element. Of course, if the sun itself is included in your photograph, it’s impossible to keep the sun from striking the lens. In this case, your lens must be top quality to minimize lens flare. Lenses with better quality coatings and fewer elements perform better when aimed at the sun.
 Fog is created when moisture condenses in the air. This can occur when warm moist air passes over a colder land mass, when cold air crosses warm bodies of water, or when the air temperature drops to the dew point close to the ground. Often found in the early morning or within a few minutes of sunrise, it creates soft light on animal fur as they move through the mist. It creates interesting effects on landscapes and scenics by softening harsh textures. There is a feeling of mystery when the fog is caught moving in and out of the trees or around a mountain base. Fog creates a sense of mystery and loneliness; a sense of isolation.
 Look for subjects which benefit from the coloration. Glaciers reflect the blue of the sky, enhancing their cold quality. Think of cool temperature sensations. Blue flowers look bluer in the shade. Gray rocks take on a blue tones. Shade can be used as a soft light which can show details in the subject. Use it in combination with direct (morning/evening) light from a reflector to get contrasting colors of pink or gold and blue in the same frame.
 One of the most dramatic techniques of light and photography is the silhouette. Silhouettes create dramatic outlines of your subject. They work best when combined with a lovely sky and background. Silhouettes get their name from the small black paper cutouts made popular in the 18th century by Etienne de Silhouette, a French author and politician, who made these gifts for friends and relatives.
 When can the sun look like the moon? When photographed in the middle of the day and underexposed. The more the camera meter is adjusted towards underexposure, the less light is recorded on the film. When extremely underexposed, the only light recorded on the film is the brightest spots of light. The sun is a bright spot of light. With a strong foreground such as a mountain or forest, severe underexposure creates a dramatic silhouette. If the sun is included in the frame, the dark image can easily be mistaken for a moonlit scene.
 Several companies manufacture and sell starburst filters that will cause any bright point spot to record on film as a multi-pointed “star”. These filters work because of fine scratches on their surface that cause the light to distort. Unfortunately, the starburst filters also cause a degradation of overall image quality for the same reason. The good news is that you don’t need a special filter to get this affect. You can create starbursts in your image by closing down the aperture of the lens to its smallest opening. The aperture of a camera lens is not a perfect circle. It is made up of layers of metal blades which create small corners in the “circle” of the aperture, similar to an octagon. Intense bright spots such as a bright spot of light in a drop of water or the sun coming through the trees travels past the aperture and flares out along those “corners” or points. This creates the star effect, a very exciting addition to a scenic.
 One of the most popular photographic subjects is the setting sun. The sun is near the horizon, hovering above the landscape, and it’s big and orange or red and so pretty. When you get your film back, though, the sun seems to be nothing more than a small orange point of light lost in a frame of colorful clouds. How do you get the big sun effect that you see so often in photos in the magazines?
 Star trails can work alone in the sky or with a dramatic foreground such as trees or a mountain. It is not necessary or useful to make a meter reading when photographing star trails. Simple choose a dark location with a good view of the stars, set up the camera on a tripod, load 100 ISO film, open the lens to the maximum aperture, and start the exposure. If the foreground subject is close enough, illuminate it briefly with a flash or fire light to add drama to the image. Depending on the amount of “streak” you desire, exposure times may range from one hour to all night. Start experimenting at 4 hours. A wide angle lens requires longer exposure time, as the wide perspective captures short lines in the sky. A longer focal length may require shorter exposure times, as they magnify the lights in the sky. Polaris, the north star, is located directly above the north pole. All the stars in the northern hemisphere will appear to circle this star if you include it in the photograph, while it will remain a motionless point of light. Putting the north star in a corner or the center of your viewfinder will create a curved or spinning “trail” of stars on your film. The longer the exposure, the longer the lines of stars across the film. The shorter the exposure, the shorter the lines or “trails”.
 Longer exposures will create an egg shaped moon, or a blur across the sky. If you can’t wait for the harvest moon effect, a long lens will also flatten the perspective of the moon against the landscape and the moon may appear closer and larger.
 Direct flash illuminates a subject with bright white light. It is highly effective with fast subjects as it “stops them in their tracks”. It is also good for closeup work when the light levels are low or the subject is moving. Stopping a flower dancing in the breeze with a beetle on it requires the use of flash to stop the action. When flash is the only source of light, as in caves and at night, it is a requirement.
 One noticeable characteristic of flash is that it can illuminate the foreground and the subject but black out the background. This can either separate the image from the background or cause the background to appear artificial. Direct flash can also influence the colors of the subject or overwhelm them with the brightness of the white light. Bright colors may appear more brilliant and subtle pastels may be washed out.
 Planning involves preparation and scheduling. Many calendars are available which list the different phases of the moon. If you are photographing tide pools or shore birds, tides are critical information. Planning on the full moon, calendars help you plan your trip or outing accordingly. Other calendars feature “almanac” information regarding seasons and weather conditions, such as predictions based on past history for the start of a rain or storm season. These can also help you plan for light under different weather conditions in places where this information is available.
 Learn about “consistent” weather patterns in the area you are exploring. Many places offer typically one weather pattern or distinctive weather quality: Florida is typically humid and warm. Israel is sunny. Seattle and London are cloudy. Phoenix is good for lightning. Other places offer another kind of predictable weather. Hurricane Ridge in the Olympic National Park, Washington, along with other high altitude mountain ridges, is well known for constantly changing weather; one minute sun and the next snow.
 light. Chiffon allows a lot of light through and ripstop nylon allows for more diffusion. White is the color of choice in fabrics. Using some form of frame and prop holds the cloth away from the subject and leaves hands free to work the camera. Or have a friend hold the cloth for you.
 They may be used to create side lighting for use with a diffuser or to block the sun and create shade. Use them as supplemental lighting to alter the color temperature of the light. Using a gold reflector adds warmth and a golden light to the subject and can make it glow. A silver reflector adds a cool white light, and other colors can be used to shine onto the subject.
 We should use filters like we use spices when we cook. We are not changing the flavor of the food, just enhancing it. Use filters wisely and carefully. Filters enhance, affect and change the image we see through the lens. When the human eye looks into shade at an autumn leaf, it sees the warm, red colors of fall. The camera and film sees a cool blue tone. A filter can correct the image to appear as we “perceived” it. But, as with spices, too much of a good thing may distort reality.

 the brighter “upper” part of the image to have bright tones “neutralized” or brought to a closer tone level to the
  lower part. If the sky is too bright, compared to the foreground, the photo will lose all detail in the bright areas. You can see this in the photograph to the left. It is wonderful for sunsets, mountaintop scenics with a dark foreground, and in any situation where the contrast between the brightest and the darkest in the two halves on the screen overwhelm the film’s ability to “see” the tones. It can be used to darken the bright sky in the background or to darken the bright rocks in the foreground by using it upside down.
 The colors of a graduated filter can be found in:
 A research project by Fuji Films, in an attempt to find out what “temperature” and colors people prefer, found people remember colors more vividly than they actually appeared in reality. Think about the colors found in fireworks. Close your eyes and remember the last set of fireworks you watched. Remember the vivid colors exploding in the dark sky. How electric they are. But if we could see those fireworks again, they would appear different. How would reality compare to your memory? Fireworks are mostly pastel in color: pinks, light blues, light greens, yellow. But most of us probably remembered flaming reds and brilliant purples.
 Slide film is difficult to show your friends without expensive equipment. The image is small, unlike print film usually sized 4×6 inches per print, it doesn’t carry in your pocket very well. The advantage of slide film is that what you get back from the lab is your film, not a copy of it. If the slide is dark, it’s your mistake. If the color balance is wrong, your mistake. There is no lab interpretation and no middle process to alter or “fix” your pictures. We recommend you use slide film during our courses for this reason. Therefore, these class notes are aimed at the user of slide film, although the print film user can use the same techniques with excellent results.
 In the class, we refer to the “ideal” camera as a 35mm SLR camera. SLR means single lens reflex. Old box cameras and rangefinder cameras, and most new point-and-shoot and digital cameras have a viewfinder separate from the view through the lens. In the viewfinder are etched boxes to show the photographer the outline of the view of the lens. SLR cameras have a prism and mirror inside the camera which direct the actual view through the lens to the eye. What you see is a fairly accurate representation of what the film will see. You see what the lens sees.
 Unfortunately, we find that the approximation is not very accurate for us, and we have to zoom out slightly to check the edges for intruders before exposing our film. We recommend that if you can afford them, 100% viewfinders make tight compositions 100% easier.
 A camera purchased new today is a state-of-the-art computer, not just a glorified picture taker. In fact, the technical aspect of taking an actual photograph is the easiest thing the camera does. A computer isn’t even needed to accomplish that. Figuring out how to take the picture can require very sophisticated computer engineering. Nowadays, cameras beep, blink, flash, pop and whir and click at you. Some even talk to you: “There is not enough light to make a proper exposure.” It’s a little scary.
 Most cameras come with a variety of program selections. They are often marked with a letter of the alphabet and you are supposed to understand what it means. Here is a brief list. For more specific information, look in your manual.
 This is the dial, switch or control which adjusts the speed of the shutter inside the camera. When the camera is in manual mode, you have control over the speed. The speed or shutter dial tells the camera to open and close the shutter at the set speed. It controls the time light comes into the camera and exposes the film. We will discuss its purpose more in the Exposure section. Each camera model has the speed dial or shutter control in a different location. Some cameras feature the dial on top of the body, while others use one switch to control both aperture and shutter, but you press a different button somewhere else on the camera to choose which one you want to adjust. Read your manual to find out how this works.
 Either seen as a counter through a small window, usually by the shutter release, or as an LCD readout, this information tells you how many pictures you have taken. Occasionally, it can be set to show how many pictures are left.
 Opening the back of the camera, you will find the shutter behind the reflex mirror and the lens. After the mirror lifts, the shutter slides away exposing the film. The shutter controls the amount of time the film is exposed. There are several types of shutters, leaf or focal plane, but they all do the same thing. When installing film in the camera, take care not to touch the shutter blades. They are easily damaged, and repair costs can be exorbitant.
 There are a variety of lens types for photographers to use: fixed, zoom, macro, and combinations of fixed and zoom lens with macro capabilities. Let’s examine the differences among them.
 There are many zoom lenses that claim to be “macro” lenses. These lenses usually only focus to about 1/4X reproduction ratio, which is not as close as the true macros. Zoom lenses frequently have variable apertures, which is ok if you shoot on program mode. For manual exposure, however, this means that at different focal lengths, you will have to readjust your shutter speed as you zoom. Zoom lenses have the advantage of allowing you to move closer or farther away without actually moving your tripod or camera. Zooms are also usually slower (have smaller wide open apertures) than fixed lenses.
 Mirror lenses are cheaper and lighter to carry, but they have some serious drawbacks. They feature a fixed aperture, usually f 8 or so, making low-light exposures nearly impossible. The mirror also highlights bright spots and turns them into “donuts” in your image. For serious nature photography, invest in a good quality fixed or zoom lens to increase your magnification.


 A wide angle lens sees a wide angle of view. The first thing people think of is that a wide angle lens will let them include more of a scene in the image, and this is true. What they don’t consider, however, is what the short focal length will do to the appearance of the subject. If you were to make a head and shoulders portrait of your best friend using a 20mm lens, you would have to stand a distance of about a foot (30 cm) away from him. At this distance, his nose would be much closer to the lens than his ears, and so the nose would be much bigger proportionally than the ears in the photograph. This is generally not a flattering effect, and so we don’t use wide angle lenses to photograph closeups of people. The same effect happens when we photograph flowers closeup with a wide angle lens. The parts of the flower that are closer to the lens appear proportionally bigger in the resulting photograph than the other parts of the flower, or than the other flowers in the picture. A wide angle lens will cause objects closer to the lens to appear proportionally larger in the photograph than the other objects in the picture. This is useful for separating an object from surrounding objects, making the objects appear farther apart. Wide angle lenses seem to expand space.
 At this distance, the nose and ears are all approximately the same distance from the lens, so there is no apparent distortion of perspective. The person will appear as we expect him to appear, because we’re used to seeing people from across a room. We don’t usually see people from extremely close up, and so the view from the 20mm lens seems strange to us. If there are other people in the picture, they will also appear normal.


 The disadvantage is that the maximum aperture is reduced by the magnification increase. A 1.4X teleconverter costs 1 stop of light, and a 2X costs 2 stops. So an f 2.8 lens becomes f 4 or f 5.6 with a 1.4X or a 2X, respectively. Light loss makes focusing more difficult, and results in slower shutter speeds. There is also a slight loss of quality with the use of a teleconverter, but if a quality prime lens is used, the loss should be negligible.
 Tripods offer that guarantee and we use them for two distinct reasons. One, tripods cut camera vibration. They hold the camera steady and still and allow us to take a sharp photograph, regardless of light levels. Two, tripods encourage careful compositions. They force you to spend more time with your subject, exploring your creative options. Anytime you spend more time with someone or something, you get to know it better. It’s amazing what you learn.
 The tripod head is often bought separately from the tripod legs. There are two kinds: pan-tilt and ball head. A pan-tilt head allows for separate horizontal and vertical controls. A ball head allows for freedom of movement in all directions using a ball-and-socket joint. Pan-tilts have different knobs that twist and turn and stick out from the tripod head, controlling each of the horizontal and vertical tilting elements. A ball head often has only one or two knobs which control the locking mechanism and the tension. Scenic photographers tend to prefer the pan-tilt head, but most other nature photographers prefer the ball head, as it allows for greater ease of movement and positioning.
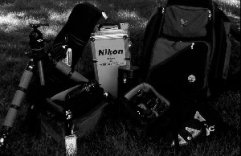
 Before going bag hunting, put your equipment together in one place and play with it to get an idea of how big a bag you really need. Does everything go with you every time you go out? Or do you customize your equipment each time to meet the requirements of your target subject? Do you prefer a shoulder bag, fanny pack or the backpack style? After you have a preliminary idea of what you need, put your equipment in the car and head down to the local, well-stocked camera store. The best way to choose a bag is to put your gear in your prospective purchases and see which is best before you take it home. Make sure that it all fits comfortably without rubbing or stressing the equipment. Can you get it in and out easily, without fussing or hunting? Play with it and see if it works for you before you hand over your credit card.
 Look at the labels for the listing of fabrics used. Look for durable fabrics such as denier or cordura? Is the outside fabric durable or just resistant? Check seams to make sure they are even and sewn all the way through. Is the stitching strong with small, even stitches, enforced with bias tape? Are all the pockets accessible and easy to open? Are the straps securely attached with adequate stitching and is there room to attach additional straps if necessary?
 How do the straps work for you? Shoulder strap bags are great if you are rushing to an airplane and need to toss it off for the security scans. They are great for working out of a car. But for the long hikes, a fanny pack or backpack are better bets. Check the straps that rest on your shoulders and hips. Are they thickly padded? Thin supports and padding can cut right through clothing and wear into the skin on long hikes. Is the pack soft where it meets your body or does it rub against you as you move? Have an experienced salesperson help fit it to your body for maximum comfort and support. Make sure your bag or pack will distribute the weight so you don’t injure yourself when you carry it.
 There are so many different bags on the market, choosing one can be overwhelming. You can buy the traditional styles, or go for the add-as-you-need modular systems.There are backpacks which are camera bags and camera bags which are backpacks. LowePro and other manufacturers are making packs that can be split into separate pieces. You need to find one that meets your specific needs. Like shoes, you’ll probably own several before finding the right one.
 A tripod is the best support for a camera. If you must handhold your camera for a photograph, the best body position is to place the heel of your left hand under the base of the camera, fingers supporting the bottom of the camera lens. Place your right hand around the camera grip (provided on most advanced camera bodies), finger on the shutter. Brace your right thumb against the back of the camera body. Your wrists may touch, depending upon the width of the camera. Tuck your elbows in as close to your chest as possible and place the viewfinder up to your eye and the camera against your face, your nose angled to the left (for using the right eye through the viewfinder). Focus and meter your subject. When you are ready to press the shutter, take a breath, release it and then press the shutter after you exhale and before you inhale again. This is generally when the body is the most still. To stabilize yourself more, lean against a car, wall or post. In general, avoid hand holding at low shutter speeds.
 We always carry extra shower caps with us. Not only do they cover the camera body and lens to protect them from rain, sun, and wind, their bowl-like shape also makes them convenient to carry small items in. They can be bunched up and stuck into the pocket or a corner of your camera bag without taking up any space or adding weight.
 We use these like the shower caps, but they cover larger items, and at the very least, they can carry out the garbage with us when we go.
 The Hitchhiker’s Guide to the Galaxy had it right: Always carry a towel. Towels are great for drying off photographers and their equipment when caught in the rain. They can act like blankets, pillows, and cushions for sore bottoms, and provide shade when you need it. A rolled up towel can be used as a camera support on a window or against any hard surface.
 In intense sunlight, a hat can block the sun entering your viewfinder and stop the sun from influencing your meter reading.
 Sun wears down almost everything manmade when exposed over long periods of time. Substances most intolerant to excessive sun exposure include rubber and cloth. Rubber lens hoods and rubber viewfinder eye pieces may dry out and crumble over time. Cloth will bleach and disintegrate. Camera bags and packs will discolor. Newer fabrics such as 1000 denier Cordura Plus hold up extremely well under such tortures, but they will fade out under long-term exposure.
 Brent and I work in a team. Often you will find me with or without my camera wandering and crawling around inspecting the area. Attached to my head is a headphone walkie talkie. Voice activated and extremely quiet, I can whisper alerts and information to Brent to help him anticipate wildlife opportunities.


